Introduction
Are you planning to grout tile but don’t know where to start? Grouting tile can be a daunting task, especially for beginners. But don’t worry! This article will guide you through the process step-by-step, from preparing the surface to sealing the grout. Whether you’re renovating your bathroom, kitchen or any other area, this guide will provide you with all the information you need to successfully grout tile.
Step-by-Step Guide
Introduction to the tools and materials required for grouting tile
Before you can start grouting, you’ll need to gather the necessary tools and materials for the job. Some of the tools you will need include a grout float, sponge, trowel, bucket, and safety goggles. As for materials, you’ll need grout, a sealant, and tape. When selecting grout, make sure to choose the appropriate color, texture, and type for your specific project.
Preparing the surface for grouting
Once you have your tools and materials ready, you’ll need to clean the surface of the tiles and let them dry thoroughly. Ensure that the surface of the tiles is free of any debris that could affect the grouting process.
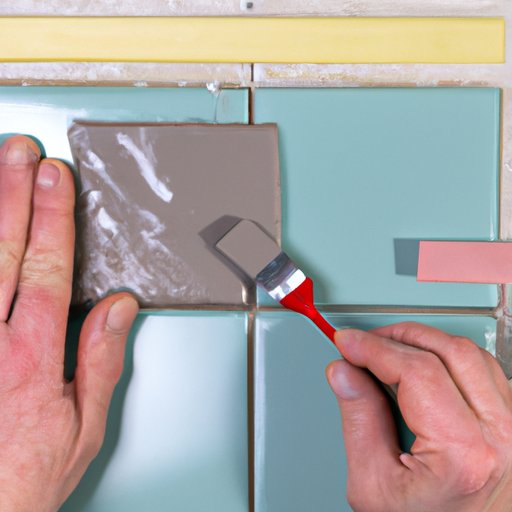
Mixing the grout and applying it to the tile
Mix the grout according to the manufacturer’s instructions. After mixing, use the grout float to spread the grout evenly over the tiles, ensuring that all gaps are filled. Allow the grout to settle for 10-15 minutes.
Wiping off excess grout and cleaning the tiles
Use a damp sponge to wipe off any excess grout on the surface of the tiles. Take care not to remove too much grout from the gaps between tiles.
Drying and sealing the grout
Allow the grout to dry for a minimum of 24 hours before sealing it. You can use a sealant to protect the grout from moisture and stains. Follow the manufacturer’s instructions for applying the sealant.
Tips and tricks to ensure proper grouting and avoid common mistakes
When dealing with grout, it’s important to keep the following tips in mind:
– Mix grout in small batches to prevent it from drying out
– Work in small sections to ensure that the grout doesn’t dry too quickly
– Use painters tape to create a clean line for your grout application
– Use a bucket of water for cleaning the tiles
– Wear safety goggles to protect your eyes
Video Tutorial
If you’re a visual learner and prefer to watch a demonstration, here is a helpful video tutorial:
Tools and materials used in the video
The video tutorial makes use of tools such as a grout float, sponge, and a trowel.
Step-by-step instructions on how to grout tile in a visual format
The video tutorial will guide you through the grouting process, step-by-step. You’ll visually understand how grout should be mixed and spread, and how the surface should be wiped down and sealed.
Additional tips and tricks mentioned in the video
The video tutorial provides additional tips for efficient grouting such as working in small sections, being patient, and double-checking the color of the grout.
Do-It-Yourself Tips
Common issues encountered when grouting tile
As with most home renovation tasks, grouting tile can come with its own set of challenges, which include:
– Uneven grout lines
– Color inconsistency
– Excess grout in the gap between tiles
Practical solutions to these issues
Here are some quick fixes for common grouting issues:
– Use painter’s tape to get a clean, straight line
– You can choose a grout colorant if the initial color is incorrect
– Use a utility knife to scrape off excess grout before it dries
Additional tips for efficient grouting
In addition to the above, consider the following tips for efficient grouting:
– Work in smaller sections
– Use a bucket of water for cleaning
– Don’t be afraid to ask for help
Tool and Material Guide
Detailed description and pictures of each tool and material required for grouting tile
To help you choose the appropriate tools and materials for your project, here’s a detailed guide:
Grout Float: This tool is used to spread grout evenly over the surface of the tiles.
Sponge: Used to clean off excess grout on the tile surface.
Trowel: A handheld tool with a flat, pointed blade for spreading and shaping grout.
Bucket: A simple water bucket is necessary for cleaning the tiles during the process.
Safety Goggles: Protect your eyes with safety goggles.
Grout: Grout is the mixture used to fill the gaps between tiles.
Sealant: A product used to seal and protect the grout after it’s been applied.
Functions and features of each tool and material
Each tool has a specific function. For instance, a grout float is used to spread grout, while a sponge is used to clean excess grout. Materials such as grout are specifically designed to fill gaps between tiles.
List of different types of grout available in the market
There are three different types of grout: sanded grout, unsanded grout, and epoxy grout. Sanded grout is best for gaps that are larger than ⅛ inch. Unsanded grout, on the other hand, is ideal for gaps that are less than ⅛ inch. Epoxy grout is the most durable of the three and is often used for commercial projects.
Tips on how to choose the right tools and materials for specific tile grouting jobs
When choosing the right tools and materials, it’s important to consider the size and location of your project. Smaller-scale jobs may only need basic tools, while larger projects would benefit from professional-grade equipment.
Comparison Guide
Comparison of different types of grout, tools, and materials
Here’s a comparison of different grouting products, tools, and materials to help you make the best decisions for your project.
Pros and cons of each product presented
Each type of product comes with its pros and cons. For instance, while sanded grout has excellent durability, it can be difficult to use in gaps that are smaller than ⅛ inch.
Recommendations on the best products for specific tile grouting needs
Based on your specific tile grouting needs, make sure to do your research as to which type of product is best suited for your project. Take into account the size and location of the project, the materials used in it, and the type of tile being used.
Conclusion
In conclusion, grouting tile can be a time-consuming task, but with the right tools and knowledge, the results can be spectacular. We hope this step-by-step guide has provided you with the necessary information to tackle your tile-grouting project with confidence. Don’t hesitate to leave your questions and comments in the section below. Remember, with the right tools and a little patience, a beautiful tile surface is within your reach.