I. Introduction
Learning how to draw a nose can be a challenging yet rewarding experience for any artist. A realistic nose drawing can add depth and dimension to a portrait or character illustration. In this article, we will provide a comprehensive guide to drawing a nose step by step. From understanding nose anatomy to shading techniques, we will cover all aspects of the art of drawing a nose.
II. A Step-by-Step Guide to Drawing a Nose
Before starting to draw a nose, it’s important to consider the basic shapes that build up the nose.
A. Start with Basic Shapes
Using basic shapes such as a triangle and a circle, sketch a rough outline of the nose. This will help you visualize its position and proportion in relation to the rest of the face.
B. Create the Structure of the Nose
Next, add more detail to the nose by sketching its structural components such as the bridge, nostrils, and septum. Pay attention to the shape and placement of each part in relation to the basic shapes.
C. Add Detail to the Nose
Now that you have established the basic structure, it’s time to add detail to the nose. Focus on the contours and curvature of the nose. Keep in mind that each nose is unique, and so the shading and highlights will vary from individual to individual.
D. Finalize the Drawing
After adding all the details, finalize your drawing by erasing any stray lines and adding shading and highlights where necessary. Make sure that the nose is in proportion with the rest of the face.
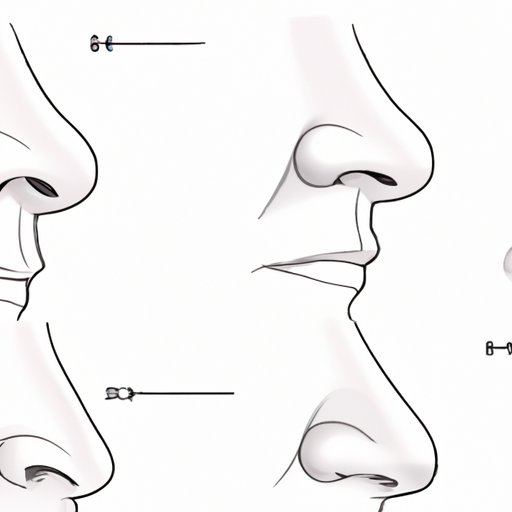
III. The Anatomy of a Nose: Understanding the Shapes and Proportions
In order to draw a nose accurately, it’s important to understand the different parts of a nose and how they relate to one another.
A. Discuss the Different Parts of a Nose
The nose is made up of the bridge, the tip, the nostrils, and the septum. Each of these parts has a unique shape and contributes to the overall appearance of the nose.
B. Explain How to Combine These Parts into a Cohesive Drawing
Incorporate the different parts of the nose into your drawing by paying close attention to their individual shapes and proportions. Keep in mind that these parts should work together to create a realistic final product.
C. Explore Common Variations in Nose Shapes
Noses come in all shapes and sizes. Some are straight and narrow, while others are wide and round. It’s important to understand these variations in order to accurately represent them in your drawings.
IV. The Art of Shading: How to Add Depth and Dimension to Your Nose Drawing
Shading is a crucial element to creating a realistic nose drawing.
A. Introduce the Concept of Shading
Shading involves using various tones of light and dark to create the illusion of depth and dimension in a drawing. It is an essential technique for any artist looking to create realistic drawings.
B. Provide Techniques for Shading a Nose Drawing
Some techniques for shading a nose include using cross-hatching, stippling, and blending. Experiment with these techniques to find the one that works best for you.
C. Address How to Use Shading to Create Realistic Textures
Textures such as wrinkles and pores can be created through shading. Think about where these textures would appear on the nose and use shading to create a realistic depiction of these features.
V. Tips and Tricks to Draw Realistic Noses Using Different Materials Like Pencils, Charcoal, and Pastels
Various materials can be used to draw noses. Each has its own advantages and disadvantages.
A. Discuss the Advantages and Disadvantages of Each Material
Pencils provide a precise and detailed drawing, while charcoal provides a more dramatic effect. Pastels can create a soft and blended effect.
B. Explain How to Use Each Material to Create a Nose Drawing
Each material requires a different technique to achieve the desired effect. Practice with each material and experiment to find your preferred medium.
C. Explore Different Techniques for Using Materials
Techniques such as layering and smudging can be used to achieve different effects with various materials. Try these techniques to create unique nose drawings.
VI. Common Mistakes to Avoid When Drawing Noses and How to Fix Them
Drawing noses can be challenging, and many artists make several common mistakes when attempting to create a nose drawing.
A. List Common Mistakes Made While Drawing Noses
These mistakes include misplacement, incorrect proportions, and over or under shading.
B. Suggest Ways to Fix These Errors
If you find that the placement or proportions of the nose are incorrect, use a ruler or reference photos to help you make corrections. Erase any areas of over-shading or add shading if under-shaded.
C. Provide Strategies for Avoiding Future Mistakes
To avoid future mistakes, continue to practice and reference anatomy and technical drawing books to sharpen your skills.
VII. Challenge Yourself: Experiment with Different Styles and Techniques to Create Unique Nose Drawings
Don’t be afraid to experiment with different styles and techniques to push your nose drawing abilities even further.
A. Encourage the Audience to Experiment with Different Drawing Techniques
Try incorporating unique lines or taking inspiration from different artists’ styles to create a distinct look.
B. Provide Examples of Unique Nose Drawings
Showcase different styles and techniques like a realistic portrait nose or a cartoon nose to inspire your creativity.
C. Suggest Further Resources for Exploring This Topic
Reading anatomy and artistic drawing resources can help you understand various aspects of the nose and a wide range of techniques to draw it.
VIII. Conclusion
Learning how to draw a nose can be a rewarding experience for any artist. By understanding nose anatomy, exploring various materials and shading techniques, avoiding common mistakes, and experimenting with different styles, anyone can create unique and realistic nose drawings.