Introduction
If you’re looking to switch up the look of your Apple Watch, changing the band is an easy and affordable way to do so. However, it can be intimidating for those who haven’t done it before, or for those who aren’t sure what tools are required. Fear not, as we’ve created a comprehensive guide on how to change an Apple Watch band.
In this article, we’ll cover six topics to help you switch out your band like a pro. We’ll start with a step-by-step guide on the necessary tools and equipment, followed by a visual tutorial. Next, we’ll provide simple hacks to change the band without any special tools, a troubleshooting guide for tricky bands, and tips from DIY enthusiasts on how to personalize and match your band. Finally, we’ll wrap up with stylish suggestions on how to mix-and-match bands and choose the best band for your Apple Watch.
Step-by-step guide: Changing the band on your Apple Watch
Before doing anything, make sure to turn off your Apple Watch to avoid any accidents. You’ll need a few things to start:
– Your Apple Watch
– A new band
– A small precision screwdriver
– A flat surface to work on
Now, let’s get started:
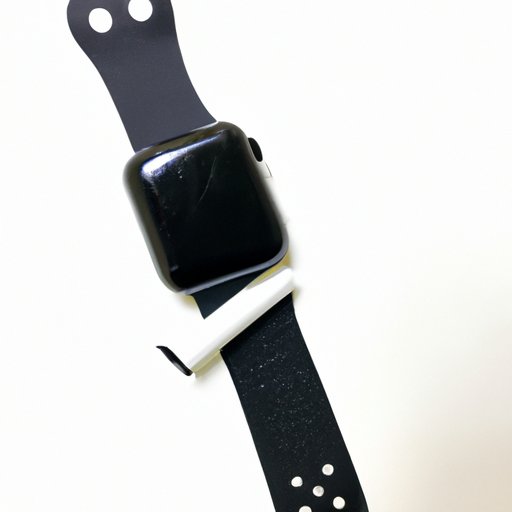
1. Locate the two small buttons on the underside of your Apple Watch band near the watch face.
2. Press and hold one of the buttons.
3. Slide that side of the band towards the center of the watch.
4. Repeat steps 2-3 for the other side of the band.
5. Once both sides are released, the band should slide out from the watch face.
6. To attach the new band, simply slide it into the groove at the top of the watch face.
7. Once it’s inserted, slide one side of the band towards the center until you hear a click.
8. Repeat step 7 for the other side of the band.
9. Check that both sides are securely attached.
Congratulations! You’ve successfully changed your Apple Watch band.
A visual tutorial: How to change an Apple Watch band in minutes
If you prefer a visual tutorial, don’t worry – we’ve got you covered. Check out this video for a step-by-step guide on how to change your Apple Watch band.
[Insert video link]
Simple hacks to change the band on your Apple Watch without any special tools
Don’t have a precision screwdriver on hand? No problem. Here are some hacks to help you change your Apple Watch band without any special tools:
– Use a paperclip: Straighten out a paperclip and insert one end into the first button hole, then press down gently until the band release clicks. Repeat for the other side.
– Use dental floss: Carefully slide dental floss under the band, close to the watch face. Use a back-and-forth sawing motion until the band releases.
– Use a credit card: Insert the edge of a credit card between the band and the watch face. Gently apply pressure while sliding the card towards the center of the watch until you hear the band click.
Tricky, but not impossible: the ultimate guide to changing Apple Watch bands
While changing an Apple Watch band is generally straightforward, there may be some tricky situations you encounter. Here are some common problems and how to troubleshoot them:
– Stuck band: If the band is stuck, try pushing the band in towards the watch face, then press the button again to release it.
– Tight band: If the band is tight, try using two fingers to push the buttons on both sides at the same time, while pulling the band away from the watch face.
– Loose band: If the band is loose, make sure you’ve securely inserted it into the groove at the top of the watch face.
– Incorrect orientation: If the band is inserted upside-down or facing the wrong way, slide it out and turn it around.
– Stripped screws: If the screws are stripped, try using tweezers with a good grip to twist them out. If that fails, take it to a professional.
DIY Apple Watch band change: tips & tricks from watch enthusiasts
Changing your Apple Watch band can also be an opportunity to personalize your watch and match it to your outfit or occasion. Here are some tips from Apple Watch enthusiasts:
– Silicone bands are great for working out or in hot weather, while leather bands or metal link bands add a dressier touch.
– Consider getting a band that matches your iPhone case or your favorite color.
– Don’t be afraid to mix-and-match bands with different colors or materials.
– Try out different styles, such as the wrap-style or the Milanese loop.
If you’re looking for new bands, check out Apple’s official website, Amazon, or third-party retailers.
Get a new look in minutes: stylish ways to swap bands on your Apple Watch
Lastly, we’ll leave you with some stylish ways to swap bands on your Apple Watch:
– Match your watch band to your outfit, whether it’s a formal event or a casual day out.
– Switch out your band for different occasions, like a sporty silicone band for a morning run or a sophisticated leather band for a night out.
– Experiment with different textures and colors to add some personality to your watch.
The possibilities are endless when it comes to changing your Apple Watch band.
Conclusion
In conclusion, changing your Apple Watch band is simple with the right tools and instructions. We covered the necessary tools, step-by-step instructions, simple hacks, troubleshooting tips, and DIY ideas for changing your band. Don’t be afraid to personalize your watch and try out different styles – the Apple Watch is meant to be customized.